Introduction
So far we have worked with the [scheduling] section of the flow.cylc
file, where workflow tasks and dependencies are defined.
Now, in the [runtime] section, we need to associate each task with a
script or application to run when its dependencies are met.
Task Definitions
The runtime settings for each task are stored in a sub-section of the
[runtime] section. E.g. for a task called hello_world we would write
settings inside the following section:
[runtime]
    [[hello_world]]
Note
A runtime sub-section for each task is normally required, even if it is
empty. However, in the previous tutorials we disabled this requirement
with flow.cylc[scheduler]allow implicit tasks.
See Implicit Tasks for more details.
The script Setting
The task script setting tells Cylc what to execute when a task is
ready to run.
This value of this setting is interpreted as a bash script. The following
example defines a task called hello_world which simply writes Hello
World! to standard output.
[runtime]
    [[hello_world]]
        script = echo 'Hello World!'
Note
A task with no script defined will run a job that does nothing but
communicate its status back to the scheduler before exiting immediately.
We can also call other scripts or executables in this way, e.g:
[runtime]
    [[hello_world]]
        script = ~/foo/bar/baz/hello_world
PATH and PYTHONPATH
Keeping task scripts with the workflow, rather than leaving them elsewhere on the system, helps isolate the workflow from external changes.
To help with this, Cylc automatically adds a bin/ sub-directory of the
workflow source directory to the executable search path ($PATH)
in task environments.
#!/bin/bash
echo 'Hello World!'
[runtime]
    [[hello_world]]
        script = hello_world
Similarly the lib/python/ directory gets prepended to the
PYTHONPATH variable.
def world():
   print('Hello World!')
[runtime]
   [[hello_world]]
      script = python -c 'import hello; hello.world()'
Tasks And Jobs
When a task is ready to run Cylc creates a job script for it: a bash file containing the scripting defined for the task along with other configuration and error trapping code. This is what actually executes as the job.
Tasks typically go through the following states as a workflow runs:
- Waiting
Waiting for dependencies to be met.
- Preparing
Dependencies met; preparing the task job script for submission.
- Submitted
Job script submitted to the job runner; waiting on execution.
- Running
Job script executing.
- Succeeded
Job completed successfully (i.e. exited with 0 return status).
There are several other task states as well, such as failed.
The Cylc User Interfaces
To help you to keep monitor and control running workflows Cylc has
A graphical user interface (Cylc GUI).
A terminal-based user interface (Cylc TUI).
A comprehensive command line interface (Cylc CLI).
The Cylc CLI
You can start, stop, query, and control workflow, in every possible way, from the command line.
All Cylc commands have built-in help information:
cylc help
cylc play --help  # etc.
The Cylc TUI
The Cylc TUI (Terminal User Interface) enables you to view and interact with your workflows.
To start the Cylc TUI:
cylc tui <workflow_id>
The Cylc GUI
The Cylc GUI has different views you can use to examine your workflows, including a Cylc scan menu allowing you to switch between workflows.
Note
You only need to have one instance of the Cylc GUI open - you can easily switch between workflows.
To start the Cylc UI, open a new terminal window or tab, then type:
cylc gui
Task & Job States
Task states have grey icons.
Job states have colour coded squares.
Task Icon |
Job Icon |
Description |
|---|---|---|
|
Task waiting |
|
|
|
Job submitted |
|
|
Job running |
|
|
Job ran successfully |
|
|
Job failed |


See also
Full list of Tasks in the GUI/Tui.
This is the “tree” view:
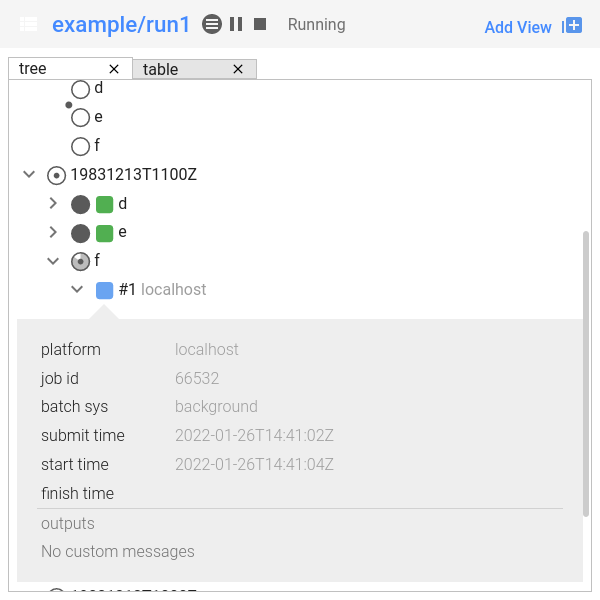
Screenshot of the Cylc GUI in “Tree” view mode.
This is the “table” view:

Screenshot of the Cylc GUI in “Table” view mode.
You can navigate between workflows using the list on the left (the screenshot shows only one, however).
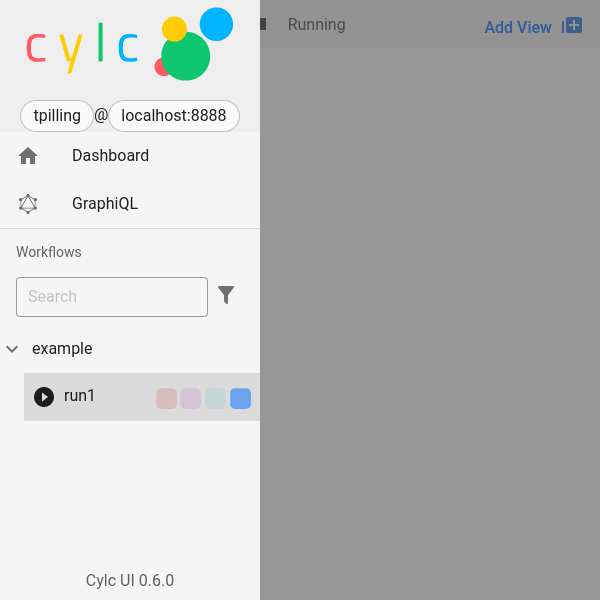
Screenshot of the Cylc GUI “Scan” bar.
Validating A Workflow
We recommend using cylc validate to check a workflow definition for
errors before running it.
$ cylc validate ~/cylc-src/my_workflow
Installing A Workflow
See also
To separate the development and running of workflows, use the cylc install command.
cylc install my_workflow
This will install ~/cylc-src/my_workflow to ~/cylc-run/my_workflow/runN.
Running a workflow
Now we have installed the workflow we can run it
using the cylc play command:
$ cylc play my_workflow
Generated Workflow Files
Numbered run directories
See also
Installing Workflows for a fuller description of Cylc install, including the option of naming rather than numbering runs.
By default cylc install will create a new numbered run directory each
time you run it:
$ cylc install my_workflow
INSTALLED my_workflow/run1 from ...
$ cylc install my_workflow
INSTALLED my_workflow/run2 from ...

# The most recent ``runX`` directory is symlinked to ``runN``
$ ls -l ~/cylc-run/my_workflow/runN
~/cylc-run/baz/runN -> run2
You can run cylc commands using a specific run number, but if you don’t,
runN will be used:
$ cylc play my_workflow
# is the same as
$ cylc play my_workflow/runN
# and the same as (in this case)
$ cylc play my_workflow/run2
Files Generated at Runtime
Cylc generates files and directories when it runs a workflow, namely:
logdbThe database which Cylc uses to record the state of the workflow;
jobThe directory where all job log files live, primarily the job script itself (
job) and the job output logs (job.outandjob.err);schedulerThe directory where scheduler log files live. These are written as the workflow runs and are useful when troubleshooting.
config/flow.cylc.processedA copy of the
flow.cylcfile made after any Jinja2 has been processed - we will cover this in the Consolidating Configuration section.remote-installInformation related to Remote Initialization file installation can be found here. A separate file is created per install target.
share/The share directory is where tasks can read or write files shared with other tasks.
work/Contains task work directories, i.e. the current working directories of running tasks. These are removed automatically if empty when a task finishes.
The job log directory path ends in
<cycle-point>/<task-name>/<job-submission-num>/, where the job submission number starts at 1 and increments each time a task re-runs.You can use the command line to view scheduler or job logs without having to find them yourself on the filesystem:
cylc cat-log <workflow-name>
cylc cat-log <workflow-name>//<cycle-point>/<task-name>
Note
If you used pip to install Cylc, you will need to run
pip install 'cylc-flow[tutorial]'
to install extra dependencies needed for running the following tutorial workflows.
Practical
In this practical we will add some scripts to, and run, the weather forecasting workflow from the scheduling tutorial.
Create A New Workflow.
The following command will copy some workflow files into a new source directory called
runtime-introduction:cylc get-resources tutorial/runtime-introduction cd ~/cylc-src/runtime-introduction
This includes the
flow.cylcfile from the weather forecasting workflow with some runtime configuration added to it.There is also a script called
get-observationslocated in the bin directory.Take a look at the
[runtime]section in theflow.cylcfile.Run The Workflow.
First validate the workflow by running:
cylc validate .
Then install the workflow:
cylc installOpen a user interface (The Cylc TUI or The Cylc GUI) to view your workflow.
Finally run the workflow by executing:
cylc play runtime-introduction
The tasks will start to run - you should see them going through the waiting, running and succeeded states. The preparing and submitted states may be too quick to notice.
When the workflow reaches the final cycle point and all tasks have succeeded the scheduler will shutdown automatically.
Tip
You can run a workflow from the Cylc GUI by pressing the “play” button at the top.
Inspect A Job Log.
Try opening the
job.outlog for one of theget_observationstasks in a text editor. The file will be in the job log directory:cd ~/cylc-run/runtime-introduction/runN cat log/job/<cycle-point>/get_observations_heathrow/01/job.outYou should see something like this:
Workflow    : runtime-introduction
Job : 20000101T0000Z/get_observations_heathrow/01 (try 1)
User@Host: username@hostname

Guessing Weather Conditions
Writing Out Wind Data

1970-01-01T00:00:00Z NORMAL - started
2038-01-19T03:14:08Z NORMAL - succeeded
The first three lines are identifying information written by Cylc.
The lines in the middle are the job stdout.
The last two lines are written by Cylc, to record job start and finish times. The started message would be above the job stdout for a longer-running job.
Inspect A Work Directory.
The
get_rainfalltask should create a file calledrainfallin its work directory. Try opening this file, recalling that the format of the relevant path from within the work directory will be:work/<cycle-point>/get_rainfall/rainfallHint
The
get_rainfalltask only runs every third cycle.Extension: Explore The Cylc GUI
Try re-installing the workflow and running it from the GUI.
Try adding a new view(s).
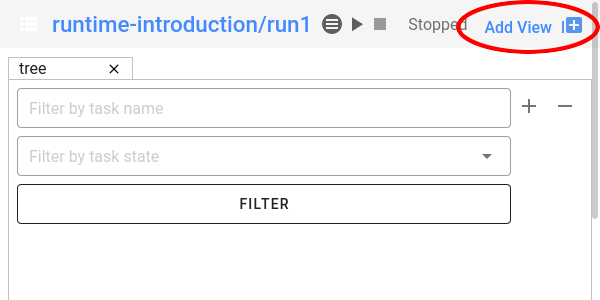
Tip
You can do this from the “Add View” button (top-right):
Try pressing the “Pause” button which is found in the top left-hand corner of the GUI.
Try clicking on a task state icon. From the menu you could try:
“Trigger”
“Hold”
“Release”
See also
See guide to Tasks in the GUI/Tui for a guide to the icons.